

The mythical Ibanez Tube Screamer is not free of issues ! Let's talk about why I dislike its sound so much.
shopping_cart
0
Latest posts
-
 Why does the Tube Screamer sound bad ?Read more
 -
 Master fuzz clean-up like a pro !Read more
Let's talk about volume clean-up, vintage fuzzes and buffer pedals, and how everything interacts together.
-
 Circuit Analysis : Electro Harmonix LPB1Read more
Let's dive deep into electronics and explore the Electro Harmonix LPB1 and Screaming bird at once !
-
 Master the art of reampingRead more
Let's talk about how to use a DI box and a reamp box and what they are doing under the hood.
-
 How to record an electric guitar : all about microphonesRead more
All you ever wanted to know about recording your electric guitar amplifier with microphones, but were afraid to ask !
-
 Guitar preamps: are they a scam?Read more
Understand what really is a guitar preamp pedal, its difference with a studio preamp and an overdrive pedal, and how...
-
 The art of stacking effects pedalsRead more
Discover how to master pedal stacking with overdrives, saturations, compressors, and time-based effects. Learn the...
-
 The ultimate power supply guideRead more
Let's explore what make a good power supply, how to choose one and how to read their labels to prevent frying up your...
-
 Flanger is the BEST modulation pedalRead more
Hot take : flanger is definitely the best modulation effect ever invented. I can have it replace a phaser, a chorus...
-
 The ultimate guide about modulation effectsRead more
Modulation effect pedals form a distinct category of guitar pedals. What are the differences between a chorus, a...
Blog categories
Search in blog
Choosing guitar cables: enhance your sound quality
Cables are, of course, essential for any guitarist — they’re what connect your guitar, pedals, and amplifier. They come in all shapes, lengths, and colors, and every player has their preferences! However, not all cables are created equal when it comes to preserving your guitar signal's quality. In this article, I’ll break it all down for you.
1. Shape, Texture, and Color
The first thing to consider when choosing a cable is whether it simply feels right for you. Sometimes, color coding can help you stay organized on your pedalboard or on stage. You might prefer tweed-style textured cables like Fender’s, braided ones, or sleek plastic-coated ones. It’s all a matter of taste, so I won’t dwell on that too much — what really interests me here is the shape.
If you're considering making your own cables, it’s worth knowing that it's usually cheaper than buying pre-made ones, and it can be a fun DIY project! Just make sure the cable diameter matches the jack connectors you've selected. If it’s too thin, it won’t hold properly and might stress the solder joints. If it's too thick, you won't be able to close the connectors.
Some cables come coiled, like the ones Frech guitarist Julien Bitoun prefers to use on stage between his guitar and pedalboard. Coiled cables naturally resist tangling, which is super convenient! But if you take good care when winding your cables, that shouldn't be a problem even with regular straight cables.
Lastly, ultra-flat cables are perfect for building a tight, compact pedalboard. They let you place pedals closer together while still being flexible. Check out Rockboard or EBS Flat Patch cables for good examples.
2. Cables and Electronics
Now let’s talk about the most frustrating part: we all have that one dodgy cable that kills our tone the moment we plug it in. The culprit? One of the trickiest concepts to explain to non-engineers: impedance.
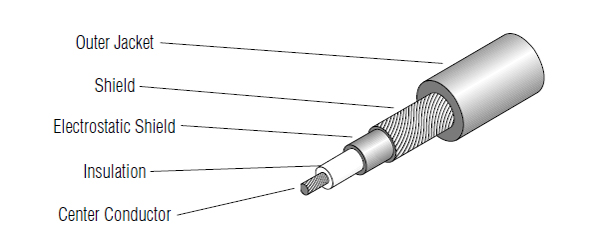
Guitar cables consist of two conductors: the central core, which carries the guitar signal, and a braided shield that surrounds it, which connects to ground and provides shielding against interference. In the following picture, you will also see a second shield called the electrostatic shield, but let’s forget this one as it will only make the explanation more complex.
Conductors aren’t perfect — each has a small resistance, which causes signal loss. Also, when a current flows through a wire, it generates a magnetic field, which means the cable also has inductance. This opposes high frequencies. Fortunately, both resistance and inductance are negligible in guitar cables. For example, a typical guitar cable has about 100Ω of resistance per kilometer — that’s just 1Ω over 10 meters!
Note: "Ω" stands for ohm, the unit of electrical resistance.
So where do the highs and clarity go with bad or overly long cables? That’s due to the last — and most important — parameter: the cable’s parasitic capacitance. Any two conductors separated by an insulator form a capacitor — and when this happens unintentionally, it’s called a parasitic capacitor. In our case, the shield wraps around the core, separated by insulation, which creates a non-negligible capacitance — around 100 to 200pF per meter.
Note: "pF" stands for picofarad. One picofarad is a trillionth (10⁻¹²) of a farad, the unit of electrical capacitance.
Alone, or right after a buffer, this wouldn’t be a big issue — buffers are designed to drive such capacitive loads. But passive electric guitars (and even some active ones) are more sensitive. Remember, guitar pickups are large inductors, and the volume/tone pots usually have high resistance values (often 250kΩ or more).
In electronics, an inductor and/or resistor followed by a capacitor forms what we call a filter. In this setup, it’s a low-pass filter, meaning it rolls off the treble. The greater the parasitic capacitance, the more highs are lost — which explains why poor-quality or long cables kill your tone.
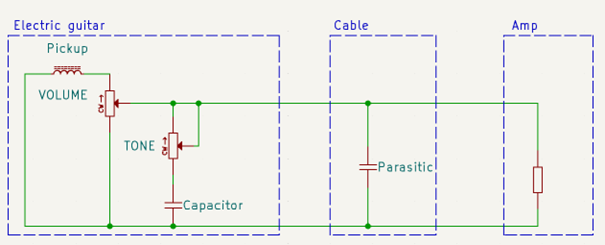
Here’s a schematic of an electric guitar: pickup, volume and tone controls, and the tone capacitor. The "Parasitic" capacitor is the one inside the cable. Let’s take a typical Strat-style single-coil pickup with the volume and tone at max. A single coil usually has around 6kΩ resistance and 3H inductance.
Note: "H" stands for henry, the unit of inductance.
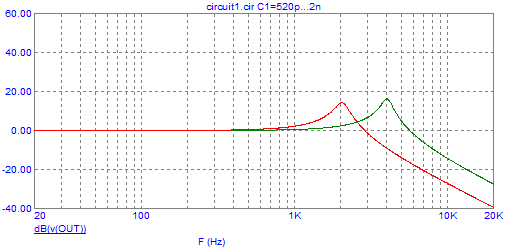
Now imagine a 10-meter cheap cable — that’s about 2000pF of parasitic capacitance. That much will start to roll off frequencies above roughly 2kHz. Since human hearing goes up to 20kHz, it’s no surprise that brightness and attack get lost: the cable is literally eating your treble!
Switch to a high-quality cable like the Sommer Spirit LLX (only 52pF per meter), and your cutoff moves up to 4kHz. That’s much better — most guitar content lives below that anyway.
And what about humbuckers? They have twice the resistance and inductance of single coils, which means the cutoff frequency is around 40% lower still. The sound gets even darker and duller.
For the curious, I’ve plotted the response of a single-coil pickup with both a bad and a good cable. The green curve (good cable) clearly extends further to the right than the red one (bad cable).
3. The Trick to a Clear Guitar Tone
Now that you understand how much your cable can impact your sound, how do you pick the right one?
Start by checking the parasitic capacitance — always go for a low value. I specifically recommend the Sommer Spirit LLX, which I consider the best guitar cable available. You’ll find more comparisons here: http://www.shootoutguitarcables.com/guitar-cables-explained/capacitance-chart.html
Also, keep in mind that thicker cables usually have lower capacitance, since the shield is further from the core. Lastly, make sure your cable has proper shielding: the thicker and denser the braid, the better the protection — though it also increases capacitance and stiffness. A single-layer braid won’t cut it when it comes to keeping interference out. Look for cables with fine mesh and two or three shielding layers.
You can also reduce your cable length if you don’t need all that slack. And if you're using a pedalboard, this is where a buffer becomes super useful! It strengthens the signal between your guitar and amp, making it more resistant to capacitance-related tone loss. I will explain buffer circuits in more detail in a following article, have a look !
I hope this article helped you better understand why cables are a critical part of your tone chain. You can intentionally darken your tone with a high-capacitance cable, sure — just make sure it's still well-shielded! And for complex pedalboards, using a buffer is almost essential. I also share my personal setup for live gigging here. Feel free to leave a comment if anything was unclear, and take care of your tone!
Related posts
-
 The vacuum tube explained
No need to known electronics ! Let's have a look at how a vacuum tube operates, and learn the differences between...Read more
The vacuum tube explained
No need to known electronics ! Let's have a look at how a vacuum tube operates, and learn the differences between...Read more -
 Audio vacuum tubes for dummies
What are the most used vacuum tubes in audio and guitar amplifiers ? What does 12AX7, GZ34 or EL84 do to the sound ?...Read more
Audio vacuum tubes for dummies
What are the most used vacuum tubes in audio and guitar amplifiers ? What does 12AX7, GZ34 or EL84 do to the sound ?...Read more -
 True Bypass vs Buffer Bypass : understanding your guitar pedal's signal path
Learn the difference between true bypass and buffer bypass to optimize your guitar signal. Avoid tone loss and...Read more
True Bypass vs Buffer Bypass : understanding your guitar pedal's signal path
Learn the difference between true bypass and buffer bypass to optimize your guitar signal. Avoid tone loss and...Read more -
The ultimate power supply guide
Let's explore what make a good power supply, how to choose one and how to read their labels to prevent frying up your...Read more
-
The art of stacking effects pedals
Discover how to master pedal stacking with overdrives, saturations, compressors, and time-based effects. Learn the...Read more
Leave a comment