

The mythical Ibanez Tube Screamer is not free of issues ! Let's talk about why I dislike its sound so much.
shopping_cart
0
Latest posts
-
 Why does the Tube Screamer sound bad ?Read more
 -
 Master fuzz clean-up like a pro !Read more
Let's talk about volume clean-up, vintage fuzzes and buffer pedals, and how everything interacts together.
-
 Circuit Analysis : Electro Harmonix LPB1Read more
Let's dive deep into electronics and explore the Electro Harmonix LPB1 and Screaming bird at once !
-
 Master the art of reampingRead more
Let's talk about how to use a DI box and a reamp box and what they are doing under the hood.
-
 How to record an electric guitar : all about microphonesRead more
All you ever wanted to know about recording your electric guitar amplifier with microphones, but were afraid to ask !
-
 Guitar preamps: are they a scam?Read more
Understand what really is a guitar preamp pedal, its difference with a studio preamp and an overdrive pedal, and how...
-
 The art of stacking effects pedalsRead more
Discover how to master pedal stacking with overdrives, saturations, compressors, and time-based effects. Learn the...
-
 The ultimate power supply guideRead more
Let's explore what make a good power supply, how to choose one and how to read their labels to prevent frying up your...
-
 Flanger is the BEST modulation pedalRead more
Hot take : flanger is definitely the best modulation effect ever invented. I can have it replace a phaser, a chorus...
-
 The ultimate guide about modulation effectsRead more
Modulation effect pedals form a distinct category of guitar pedals. What are the differences between a chorus, a...
Blog categories
Search in blog
How to record an electric guitar : all about microphones
Have you ever wondered why amp simulations never quite sound like real amplifiers? Today, I’d like to share a first clue — one that seems simple at first glance, but is in fact much more complex than it appears.
When you’re standing in a room with a speaker cabinet, you’re hearing not only the sound of the amp, but also all the room’s resonances. Plus, your ears aren’t pressed against the speaker — they’re attached to your head, usually above it, rarely directly on-axis, and often several meters away! In contrast, when an electric guitar is recorded in a studio, one or more microphones are placed in front of the speaker to capture its sound. This “studio-quality” recording is what simulators aim to reproduce — not what your ears hear in the room. So, how do you choose and position your microphone in front of your amp? Let’s take a detailed look.
1. The Origins of Microphones
In 1861, German inventor Johann Philipp Reis developed a system to convert vibrations of a membrane into an electrical signal. The sound quality was poor, and the concept was soon replaced by Elisha Gray’s 1876 design, where a needle dipped in conductive liquid produced current variations when moved by sound — a system later adapted by Alexander Graham Bell for his telephone. Still, quality was lacking until David Edward Hughes invented the carbon microphone in 1878, which became the first commercially successful microphone thanks to its reliability and clarity.
These have long since disappeared, as the pursuit of higher sound quality quickly rendered them obsolete. The real breakthrough actually came earlier, in Werner von Siemens’ 1874 patent: a diaphragm attached to a coil of wire, suspended in a magnetic field created by a permanent magnet.
Quick physics reminder: according to Laplace’s law, a conductor in a magnetic field moves when an electric current passes through it — and conversely, generates a current when it moves. The moving coil in Siemens’ design does exactly this. When an electric signal is applied, the diaphragm vibrates and produces sound — that’s the loudspeaker principle. Conversely, when sound waves make the diaphragm move, a small electric current is produced — that’s the principle behind the dynamic microphone, or more precisely, the “electrodynamic transducer.”
Sound in air is actually a variation in air pressure. When a microphone diaphragm moves because sound hits one side while the other remains at constant pressure, it acts as a pressure transducer — the capsule is then sensitive to sound from all directions, making it an omnidirectional microphone. If the other side is exposed to changing pressure as well, it becomes a pressure-gradient transducer — bidirectional, or “figure-8.” By combining these two types, we obtain other polar patterns such as cardioid, supercardioid, and hypercardioid. To visualize this, imagine the microphone standing vertically in the middle of a polar diagram, with the capsule pointing upward.
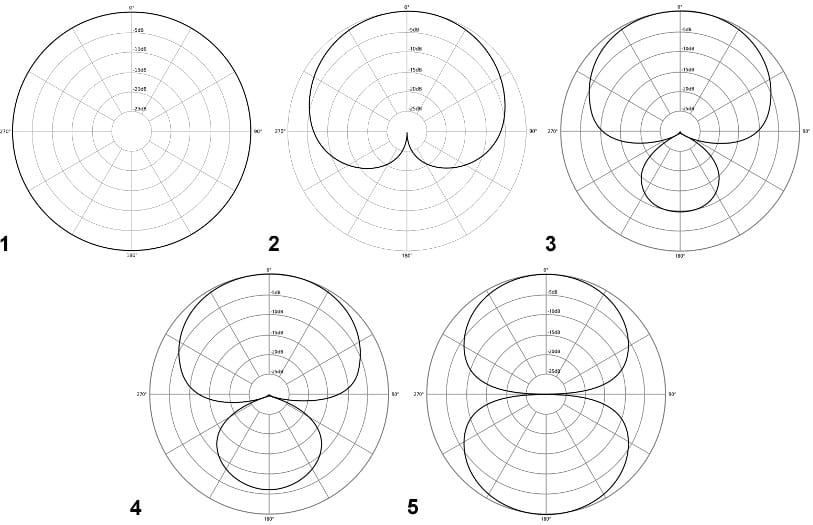
Pattern (1) is omnidirectional, (2) cardioid, (3) supercardioid, (4) hypercardioid, and (5) bidirectional.
As you can see, not all microphones are created equal. While early dynamic mics were omnidirectional, most modern ones are cardioid or supercardioid — and their directionality even varies with frequency.
Directional microphones are also very sensitive to how close the sound source is. When the source is too close, sound waves reach the diaphragm in a spherical rather than planar way, which boosts low frequencies — this is known as the proximity effect. Some mics, like the Electro-Voice RE20, include internal designs to minimize it, but this is rare. In radio, this bass boost is even desirable — it’s what gives the Shure SM7B that deep, warm voice tone when placed right at the announcer’s mouth.
2. Dynamic, Ribbon, and Condenser Microphones
We’ve already covered how dynamic microphones work. Though the patent dates back to 1874, the first commercial dynamic microphone was the Western Electric (Altec) Model 618A, released in 1931. Dynamic mics are less sensitive when the source moves away, making them ideal for noisy environments. They’re also extremely rugged — perfect for live use or loud sources such as amps and drums.
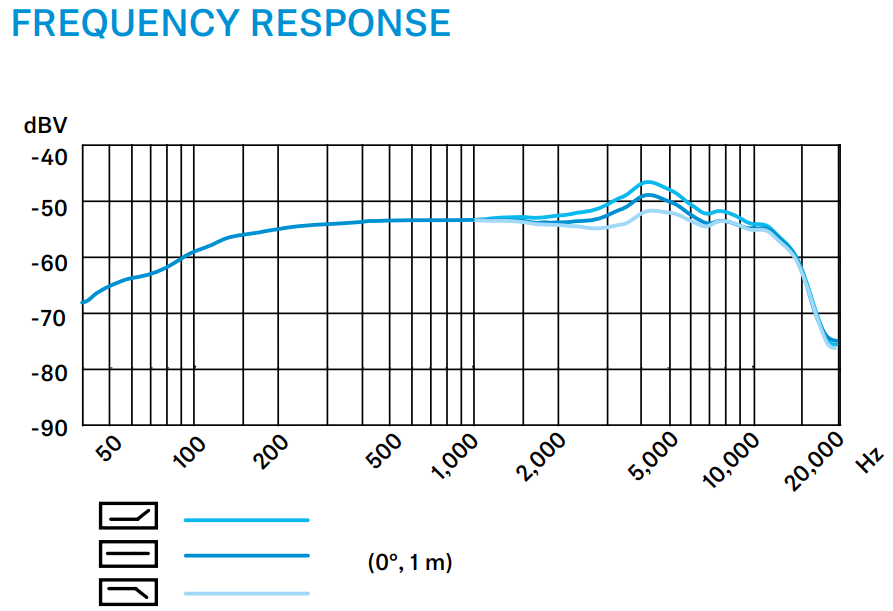
Their construction naturally emphasizes midrange frequencies, so manufacturers often use internal acoustic resonators to extend bass and treble response. This can create pronounced high-mid peaks, as heard in the legendary Shure SM57 or Sennheiser E906.
Another common type is the ribbon microphone, invented in the early 1920s by Walter Schottky and Erwin Gerlach. It works like a dynamic mic but uses a thin aluminum ribbon — just a few micrometers thick — suspended in a magnetic field instead of a coil. The zig-zag shape of the ribbon gives it strength and flexibility. Ribbon mics have a naturally wider frequency response, as they don’t require resonators, but they’re also much more fragile. Their symmetrical design makes them inherently bidirectional, and achieving cardioid patterns is far more complex.
They produce a very low output level, requiring high-quality preamps to avoid noise. In return, they offer excellent linearity and a smooth high-frequency roll-off. Interestingly, the ribbon’s thickness doesn’t determine the treble response — the geometry of the magnetic motor does. The thinner the structure, the more treble it can capture. Modern ribbon mics are much tougher than early models, and some even include active amplification circuits.
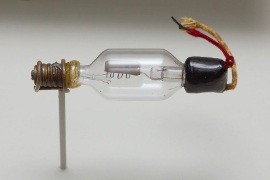
A few years earlier, in 1916, Edward Christopher Wente invented the first condenser microphone. Here, no magnets are involved: the diaphragm forms a capacitor with a backplate. As the diaphragm moves, the capacitance varies, generating a small current, which is then amplified by a built-in circuit.
These mics are active and require 48V phantom power. Dynamic mics don’t need it (though they tolerate it), while ribbon mics must never receive it, or their ribbon could be destroyed.
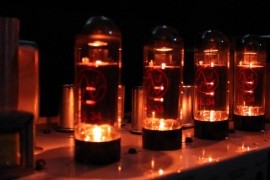
The internal amplification circuit can use tubes (as in the Neumann U67) or transistors (as in the AKG C414). Most include a transformer, though transformerless designs like the Neumann TLM103 also exist.
Sound differences between these designs are minimal if the microphone is well made and not driven into distortion — the capsule determines overall sensitivity and frequency response.
Condenser mics are classified as large-diaphragm, small-diaphragm, or electret, depending on size and construction. Large-diaphragm models tend to have more “character” and are common for vocals and acoustic instruments, while small-diaphragm types are preferred for drum overheads or piano, thanks to their extended high-frequency response.
Electret microphones, developed in the 1960s, are a variant with a permanently charged capsule, making them cheaper to produce. Only their preamp needs power. The same principle is used in MEMS microphones — tiny versions found in smartphones, though rarely (if ever) used in studio recording.
To summarize: condenser microphones are the most responsive, with the widest bandwidth; dynamic microphones are the toughest and best for isolating loud sources; ribbon microphones are prized for their smooth, natural tone on more moderate sources.
3. Microphone Placement in Front of a Speaker
As mentioned earlier, a microphone placed right against an amp won’t capture the same sound your ears hear in the room. This difference comes from several factors — directionality, frequency response, distance, and alignment.
A loudspeaker doesn’t vibrate uniformly: low frequencies are less directional, while highs are highly directional. Placing the microphone capsule at the center of the speaker gives a bright tone; moving toward the edge yields a darker tone, with many tonal possibilities in between.
Angle also matters — tilting the mic changes the balance between center and edge frequencies. Pulling the mic back reduces the proximity effect and captures a fuller picture of the speaker’s output, though it also picks up more room reflections. You can even mic the back of an open cabinet for a unique tonal character, as the speaker cone dampens part of the sound.
Combining microphones is also common practice. For example, a ribbon mic like a Royer R121 can be paired with a dynamic mic such as a Shure SM57 — the ribbon adds body and warmth, while the dynamic adds midrange bite and attack. In metal production, engineers often use the “Fredman technique,” positioning two SM57s at a 45° angle to each other to exploit phase cancellation for an even more aggressive tone.
As you can see, there are as many ways to mic an amp as there are engineers! Whether you’re just getting started or have run a studio for twenty years, I strongly encourage you to experiment with different models, positions, and combinations to find the tone that inspires you. Hopefully, you now understand why amp simulators have such a hard time replicating what you hear in the room. One way to get closer is to add a short, subtle reverb, choose condenser microphones, and simulate a few centimeters of distance from the speaker. This helps approximate what human ears would hear a few meters away from a real cabinet — even if you’ll never quite feel the visceral thump of a 100-watt tube amp shaking your bones!
Related posts
-
 The vacuum tube explained
No need to known electronics ! Let's have a look at how a vacuum tube operates, and learn the differences between...Read more
The vacuum tube explained
No need to known electronics ! Let's have a look at how a vacuum tube operates, and learn the differences between...Read more -
 Audio vacuum tubes for dummies
What are the most used vacuum tubes in audio and guitar amplifiers ? What does 12AX7, GZ34 or EL84 do to the sound ?...Read more
Audio vacuum tubes for dummies
What are the most used vacuum tubes in audio and guitar amplifiers ? What does 12AX7, GZ34 or EL84 do to the sound ?...Read more -
 True Bypass vs Buffer Bypass : understanding your guitar pedal's signal path
Learn the difference between true bypass and buffer bypass to optimize your guitar signal. Avoid tone loss and...Read more
True Bypass vs Buffer Bypass : understanding your guitar pedal's signal path
Learn the difference between true bypass and buffer bypass to optimize your guitar signal. Avoid tone loss and...Read more -
 Choosing guitar cables: enhance your sound quality
Learn how guitar cables influence your tone. From capacitance to shielding and tips to maintain signal clarity,...Read more
Choosing guitar cables: enhance your sound quality
Learn how guitar cables influence your tone. From capacitance to shielding and tips to maintain signal clarity,...Read more -
The ultimate power supply guide
Let's explore what make a good power supply, how to choose one and how to read their labels to prevent frying up your...Read more
Leave a comment