

The mythical Ibanez Tube Screamer is not free of issues ! Let's talk about why I dislike its sound so much.
shopping_cart
0
Latest posts
-
 Why does the Tube Screamer sound bad ?Read more
 -
 Master fuzz clean-up like a pro !Read more
Let's talk about volume clean-up, vintage fuzzes and buffer pedals, and how everything interacts together.
-
 Circuit Analysis : Electro Harmonix LPB1Read more
Let's dive deep into electronics and explore the Electro Harmonix LPB1 and Screaming bird at once !
-
 Master the art of reampingRead more
Let's talk about how to use a DI box and a reamp box and what they are doing under the hood.
-
 How to record an electric guitar : all about microphonesRead more
All you ever wanted to know about recording your electric guitar amplifier with microphones, but were afraid to ask !
-
 Guitar preamps: are they a scam?Read more
Understand what really is a guitar preamp pedal, its difference with a studio preamp and an overdrive pedal, and how...
-
 The art of stacking effects pedalsRead more
Discover how to master pedal stacking with overdrives, saturations, compressors, and time-based effects. Learn the...
-
 The ultimate power supply guideRead more
Let's explore what make a good power supply, how to choose one and how to read their labels to prevent frying up your...
-
 Flanger is the BEST modulation pedalRead more
Hot take : flanger is definitely the best modulation effect ever invented. I can have it replace a phaser, a chorus...
-
 The ultimate guide about modulation effectsRead more
Modulation effect pedals form a distinct category of guitar pedals. What are the differences between a chorus, a...
Blog categories
Search in blog
Master the art of reamping
To follow up on my previous article about microphones for recording your guitar, I want to talk about a system that will make your life much easier when trying to position them in front of your speaker cabinets. As you can imagine, recording your instrument straight into your amplifier and only discovering the result afterward has its limits. So how can you capture a good take while still keeping the option to adjust the amp settings, change the cabinet, or reposition the microphones?
1. DI and Reamping
There is a very simple answer to this question: record your instrument into a computer via an audio interface, with no effects, and then re-inject the recorded audio into the amplifier. But here’s the issue: can you really plug your audio interface directly into the guitar input of your amp? And how do you connect your instrument to the audio interface?
Let’s start with the basics: the recording. The vast majority of audio interfaces now include a high-impedance (Hi-Z) input specifically designed for direct connection of a bass, guitar, or any other instrument with a high output impedance. Most of the time, you’ll use an unbalanced TS instrument cable, with the signal on the tip and the ground on the sleeve. The shield helps reduce interference but doesn’t prevent all noise, especially since the electrical signal is much more sensitive because of its high impedance. Grounding problems also travel through the cable.
In a studio or at home, this may not be an issue, but imagine being on a huge stage and trying to plug your instrument into the mixing console over dozens of meters: interference, noise, and loss of signal are guaranteed. The solution is to use a direct box (DI box). A DI lowers the impedance of the signal, makes it balanced (TRS or XLR), and makes it less sensitive to long cable runs and interference, while cancelling noise. Very often, the signal is also brought down to microphone level so it can be connected to an XLR input on an audio interface or mixing console. DI boxes are widely used on stage to reduce noise from electronic instruments (synthesizers, drum machines, DJ equipment) and to capture a clean signal from some instruments (electric bass, piezo pickups on acoustic instruments), avoid noise, and make the audio path to the mixing console easier.
To send the recorded audio back into the amp, you use a box that performs the opposite operation, called a reamp box. You could theoretically plug your audio interface directly into the amp, but the signal level would be much higher than your instrument and the impedance much lower. It will work, but with extra noise (especially from the computer), and you would have to turn the track output way down. A reamp box adapts impedance and level to simulate the behavior of a guitar and avoid grounding issues and buzz.
This box becomes absolutely necessary when reamping a pedalboard that includes vintage fuzz pedals like the TAMPCO All-Bender. These fuzzes expect an electric guitar and will behave very differently if driven by a low-impedance system. Using a guitar pickup simulator or a reamp box with an impedance control is essential in this case.
Both types of boxes often include a phase switch and a ground-lift switch on the input or output XLR to avoid ground loops and reduce noise. Very useful. Many also include a PAD switch to attenuate the input by 10 or 20 dB if the source is too hot (for example, a synthesizer). Finally, some reamp boxes include volume and impedance controls, and even filters to cut certain frequencies.
2. How it works
Both DI boxes and reamp boxes exist in passive and active versions. Active models generate a tiny bit of noise and require power to operate—sometimes external power, sometimes a battery, or simply phantom power from the audio interface or mixing console for DI boxes. However, they can drive long cable lengths without issue, do not always attenuate the signal, and have a fixed, high input impedance. Passive systems, on the other hand, attenuate the signal and have an input impedance determined by the device they are connected to. They can slightly soften the sound. They cannot drive long cable runs either and are preferable in studio situations or when power is not available. Their operation relies on a transformer, which provides true galvanic isolation and helps prevent ground loops and interference.
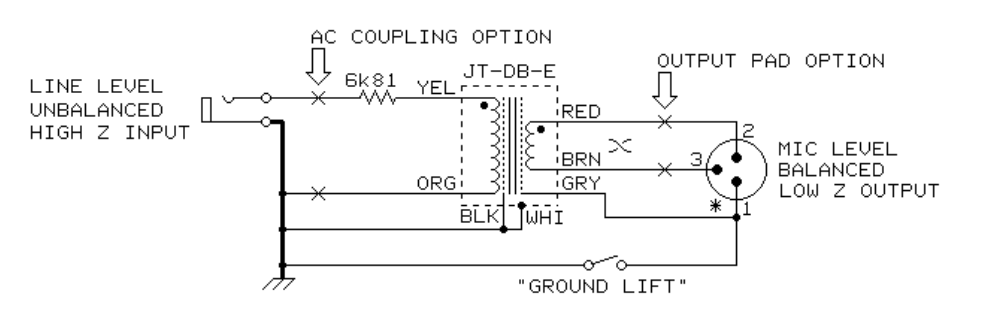
Electrically, passive systems are the simplest. For a DI, it’s very straightforward: you just use a transformer. It drastically lowers the amplitude and impedance of the instrument signal so it reaches microphone-like levels. You plug it into a mic input on the audio interface and you’re done. For example, here’s the schematic of a DI box from Jensen, a transformer manufacturer. A jack, a resistor, a transformer, and an XLR output—that’s it. You also find the ground-lift switch mentioned earlier.
For a reamp box, it’s the same principle in reverse: a transformer, sometimes a passive volume control and impedance switching or a potentiometer, and that’s it. The transformation ratio is lower for a reamp box, often 1:4, whereas DI boxes use something like 1:12. The quality of the box therefore depends heavily on the transformer. Reamp boxes usually have no trouble finding suitable transformers, but it’s harder and much more expensive for DI boxes. The DI transformer must alter the audio signal as little as possible, which requires very high inductance, meaning many turns of wire, a larger transformer, more time to manufacture, more materials, and better shielding. Yes, there really is a difference between a high-end and a low-end box.
Active systems use powered components to process the signal. Generally, a DI uses an active buffer and an inverter circuit to create the voltages expected on the two conductors of the XLR. A reamp box performs the opposite operation by calculating the difference between the voltages of the two XLR conductors to recreate the original unbalanced signal (with only one conductor). However, note that an active DI or reamp can also include a transformer for galvanic isolation. In that case, the transformer is less critical because it is placed after a buffer that provides the necessary current to pass the signal properly.
3. How to use it
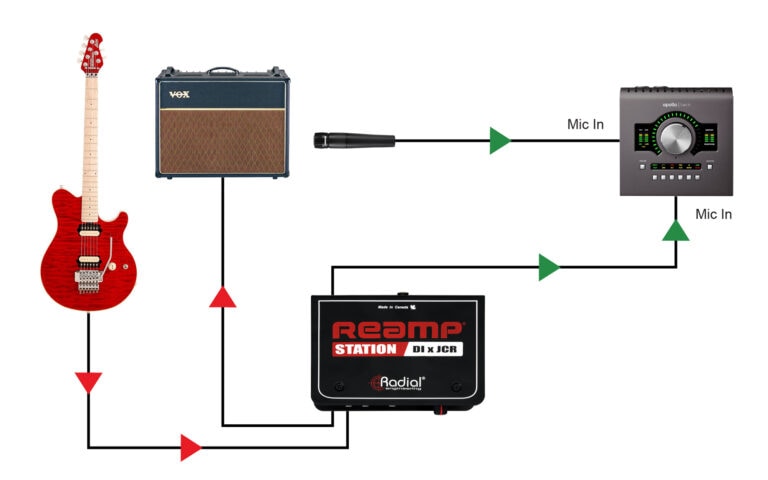
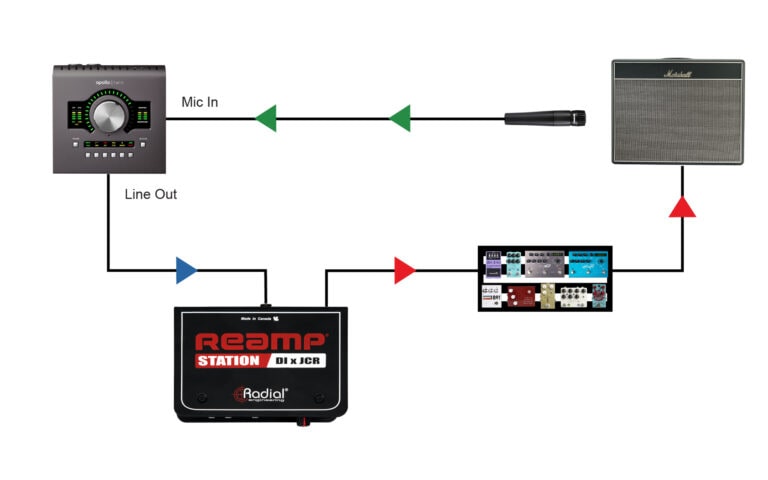
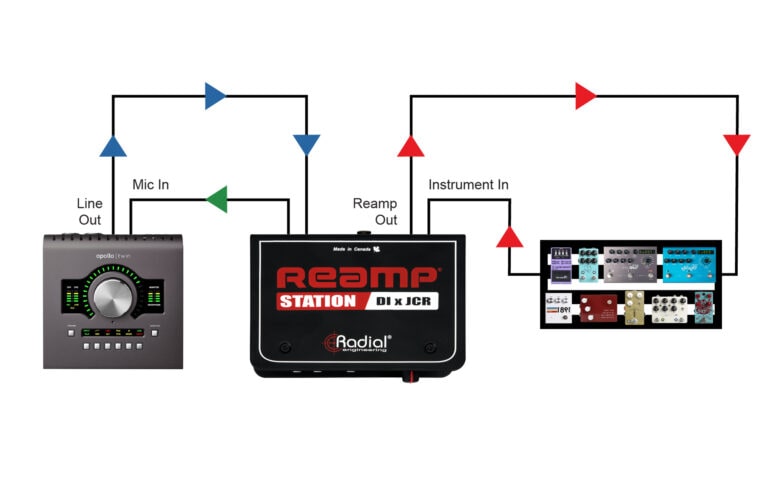
The wiring diagrams below come from Radial’s website, a world-renowned manufacturer of DI and reamp boxes used by virtually all professionals. Their products are true Swiss Army knives, with many options and variations depending on the need. The images come from a product that combines both DI and reamping.
During recording, you use the Reamp Station as a simple DI: the guitar signal is sent both to the amplifier through a through output so the musician can hear themselves, and to the audio interface with no effects or amp coloration. By placing a microphone in front of the amp, you record the amplified sound and the dry instrument signal, which you can reamp later if needed.
In the second diagram, you reamp the previously recorded audio. If the mic take wasn’t good, or if you want to record with another amp or with effects, you send the audio into the reamp section of the Reamp Station. The signal is then adapted to go through a pedalboard and into the guitar amp, which you record with a microphone.
Finally, if you only want to add effects, you simply return from the pedalboard into the DI section of the Reamp Station, which is then used to its full potential.
This last technique is the one I use to create many YouTube shorts that are essentially presets for TAMPCO pedals. It’s fun to do and always a challenge to get as close as possible to the original sounds of the songs I cover.
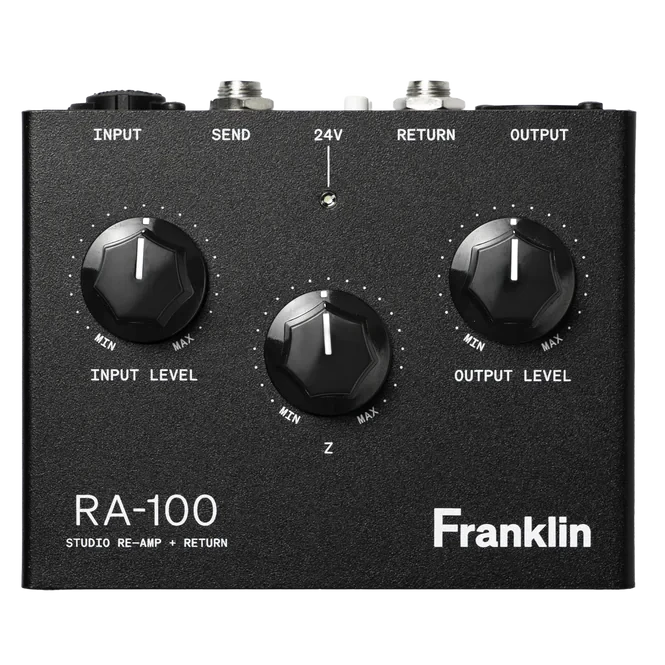
Radial is not the only manufacturer offering this type of product; you can also find options from Klark Teknik and Behringer for tighter budgets, often at the expense of audio and build quality. For more guitar-oriented gear, the Canvas series from Walrus Audio offers useful and compact DI boxes. IK Multimedia also offers reamping options built directly into their Axe I/O audio interface for an all-in-one solution. Finally, I must mention Franklin Audio, an Australian company offering just about every configuration imaginable: mono or stereo, active or passive, all-in-one units… They’ve even released a microphone preamp equipped with a reamp box, allowing you to send your voice or acoustic instrument directly into a pedalboard. Go have a look—it’s really worth it.
Related posts
-
 The vacuum tube explained
No need to known electronics ! Let's have a look at how a vacuum tube operates, and learn the differences between...Read more
The vacuum tube explained
No need to known electronics ! Let's have a look at how a vacuum tube operates, and learn the differences between...Read more -
 Audio vacuum tubes for dummies
What are the most used vacuum tubes in audio and guitar amplifiers ? What does 12AX7, GZ34 or EL84 do to the sound ?...Read more
Audio vacuum tubes for dummies
What are the most used vacuum tubes in audio and guitar amplifiers ? What does 12AX7, GZ34 or EL84 do to the sound ?...Read more -
 True Bypass vs Buffer Bypass : understanding your guitar pedal's signal path
Learn the difference between true bypass and buffer bypass to optimize your guitar signal. Avoid tone loss and...Read more
True Bypass vs Buffer Bypass : understanding your guitar pedal's signal path
Learn the difference between true bypass and buffer bypass to optimize your guitar signal. Avoid tone loss and...Read more -
 Choosing guitar cables: enhance your sound quality
Learn how guitar cables influence your tone. From capacitance to shielding and tips to maintain signal clarity,...Read more
Choosing guitar cables: enhance your sound quality
Learn how guitar cables influence your tone. From capacitance to shielding and tips to maintain signal clarity,...Read more -
The ultimate power supply guide
Let's explore what make a good power supply, how to choose one and how to read their labels to prevent frying up your...Read more
Leave a comment