

The mythical Ibanez Tube Screamer is not free of issues ! Let's talk about why I dislike its sound so much.
shopping_cart
0
Latest posts
-
 Why does the Tube Screamer sound bad ?Read more
 -
 Master fuzz clean-up like a pro !Read more
Let's talk about volume clean-up, vintage fuzzes and buffer pedals, and how everything interacts together.
-
 Circuit Analysis : Electro Harmonix LPB1Read more
Let's dive deep into electronics and explore the Electro Harmonix LPB1 and Screaming bird at once !
-
 Master the art of reampingRead more
Let's talk about how to use a DI box and a reamp box and what they are doing under the hood.
-
 How to record an electric guitar : all about microphonesRead more
All you ever wanted to know about recording your electric guitar amplifier with microphones, but were afraid to ask !
-
 Guitar preamps: are they a scam?Read more
Understand what really is a guitar preamp pedal, its difference with a studio preamp and an overdrive pedal, and how...
-
 The art of stacking effects pedalsRead more
Discover how to master pedal stacking with overdrives, saturations, compressors, and time-based effects. Learn the...
-
 The ultimate power supply guideRead more
Let's explore what make a good power supply, how to choose one and how to read their labels to prevent frying up your...
-
 Flanger is the BEST modulation pedalRead more
Hot take : flanger is definitely the best modulation effect ever invented. I can have it replace a phaser, a chorus...
-
 The ultimate guide about modulation effectsRead more
Modulation effect pedals form a distinct category of guitar pedals. What are the differences between a chorus, a...
Blog categories
Search in blog
The ultimate power supply guide
Your pedalboard is starting to look pretty serious. You’ve invested in the best boutique pedals out there—maybe even some handmade French models—and yet you’re still running into an annoying issue: noise. Buzz, hum, weird high or low frequency interference... Where the hell is that coming from? Did you really mess up your setup so badly that all these pedals are incompatible?
Not at all. The real heart of your pedalboard is its power supply. Often overlooked, it's absolutely essential for keeping your signal clean and noise-free. In this tutorial, I’ll walk you through how to properly read power supply specs and choose the right one for your rig.
1. AC/DC, connectors and polarity
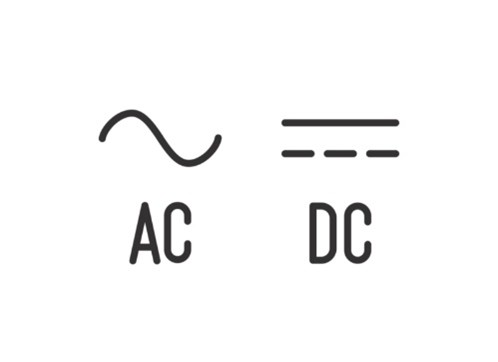
Let’s start by looking at a basic wall-wart power supply—one end plugs into the wall socket, the other into your pedal’s power jack. First thing to check: is the voltage AC (alternating current) or DC (direct current)? AC is shown as a wave symbol, DC as a straight line with three short dashes below it. Nearly all modern pedals are powered by DC nowadays.
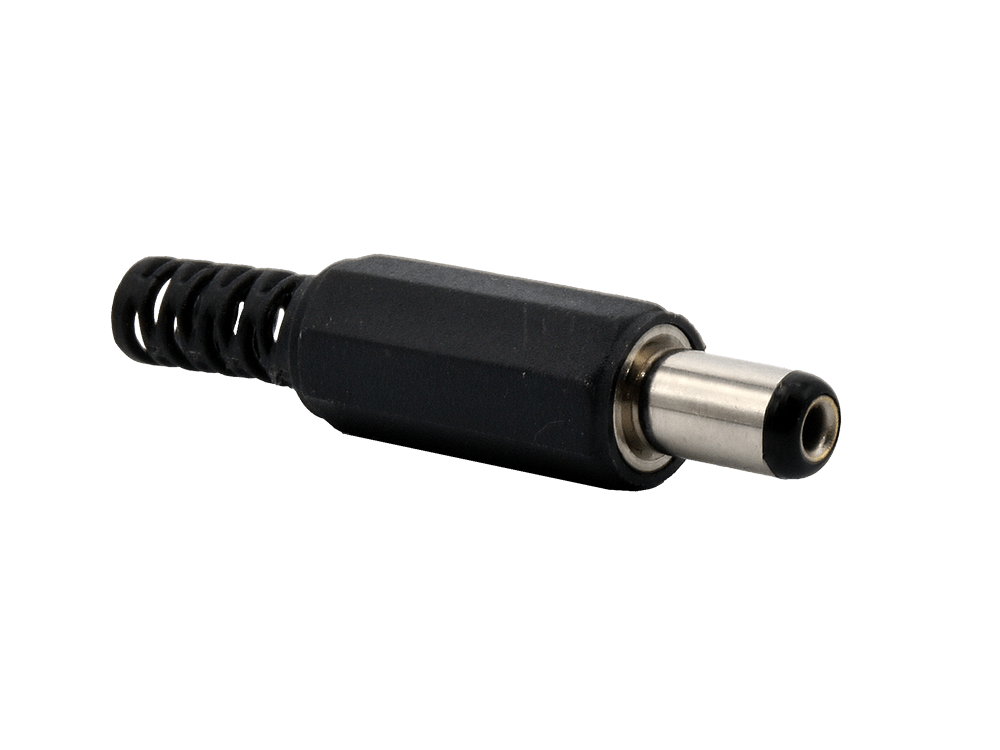
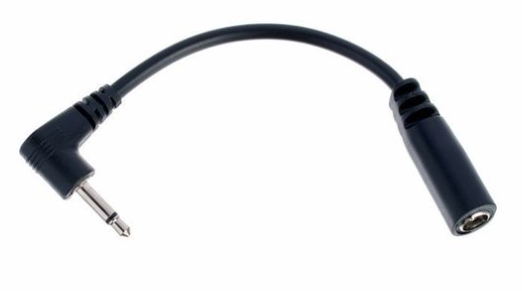
Next, you need the correct connector type. Most pedals use a cylindrical plug with a 5.5mm outer diameter and 2.1mm inner diameter. But some rare pedals—like the Ibanez TS808 Reissue, the ProCo RAT, or the Electro-Harmonix Big Muff Pi—still use the older 3.5mm jack. In that case, you’ll need either a power supply with the right plug or a 2.1mm-to-3.5mm adapter like this one.
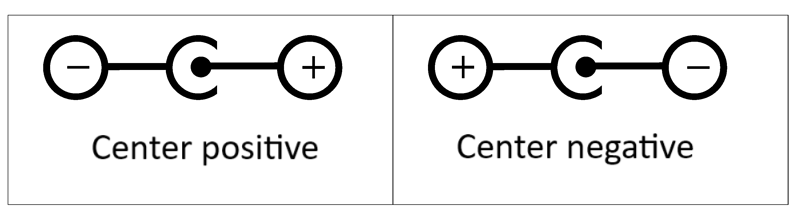
Last but not least: polarity. On the power supply label, a dot represents the center pin, and the ring is the outer sleeve. Some power supplies are center-positive (common in household electronics), while most guitar pedals are center-negative. You absolutely need to match the pedal’s polarity to avoid frying it—most pedals are not protected against reverse polarity. Thankfully, TAMPCO pedals are protected, so you’re safe there. ?
2. Voltage and current
Whether it’s AC or DC, you should always match the voltage required by your pedal. If it says 9V only, do not feed it 18V hoping for more “headroom” (yep, that’s a myth I’ll bust in another article). Overvolting a pedal can kill its components. Giving it less voltage, say 9V instead of 12V, usually won’t damage it—but it may not work properly either.
As for current, things are a bit more subtle. Let’s say your pedal draws 100mA. Your power supply needs to be able to provide at least that much. (Reminder: 100mA = 0.1A, 1000mA = 1A, etc.) Think of it like a leaky bucket—you need a tap that pours in as much water as the bucket loses. If your power supply can’t deliver enough current, it may overheat and fail. Definitely something to avoid.
Quick exercise: what can we tell from this power adapter?
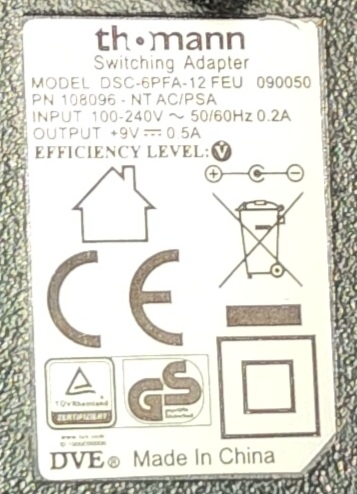
It’s center-negative, delivers 9V DC, and outputs up to 0.5A (500mA). The plug fits snugly into a standard pedal jack—so it’s good for most Boss, MXR, Ibanez or TAMPCO pedals. That said, I don’t recommend this specific model due to the noise it produces—and we’ll have a look at why later.
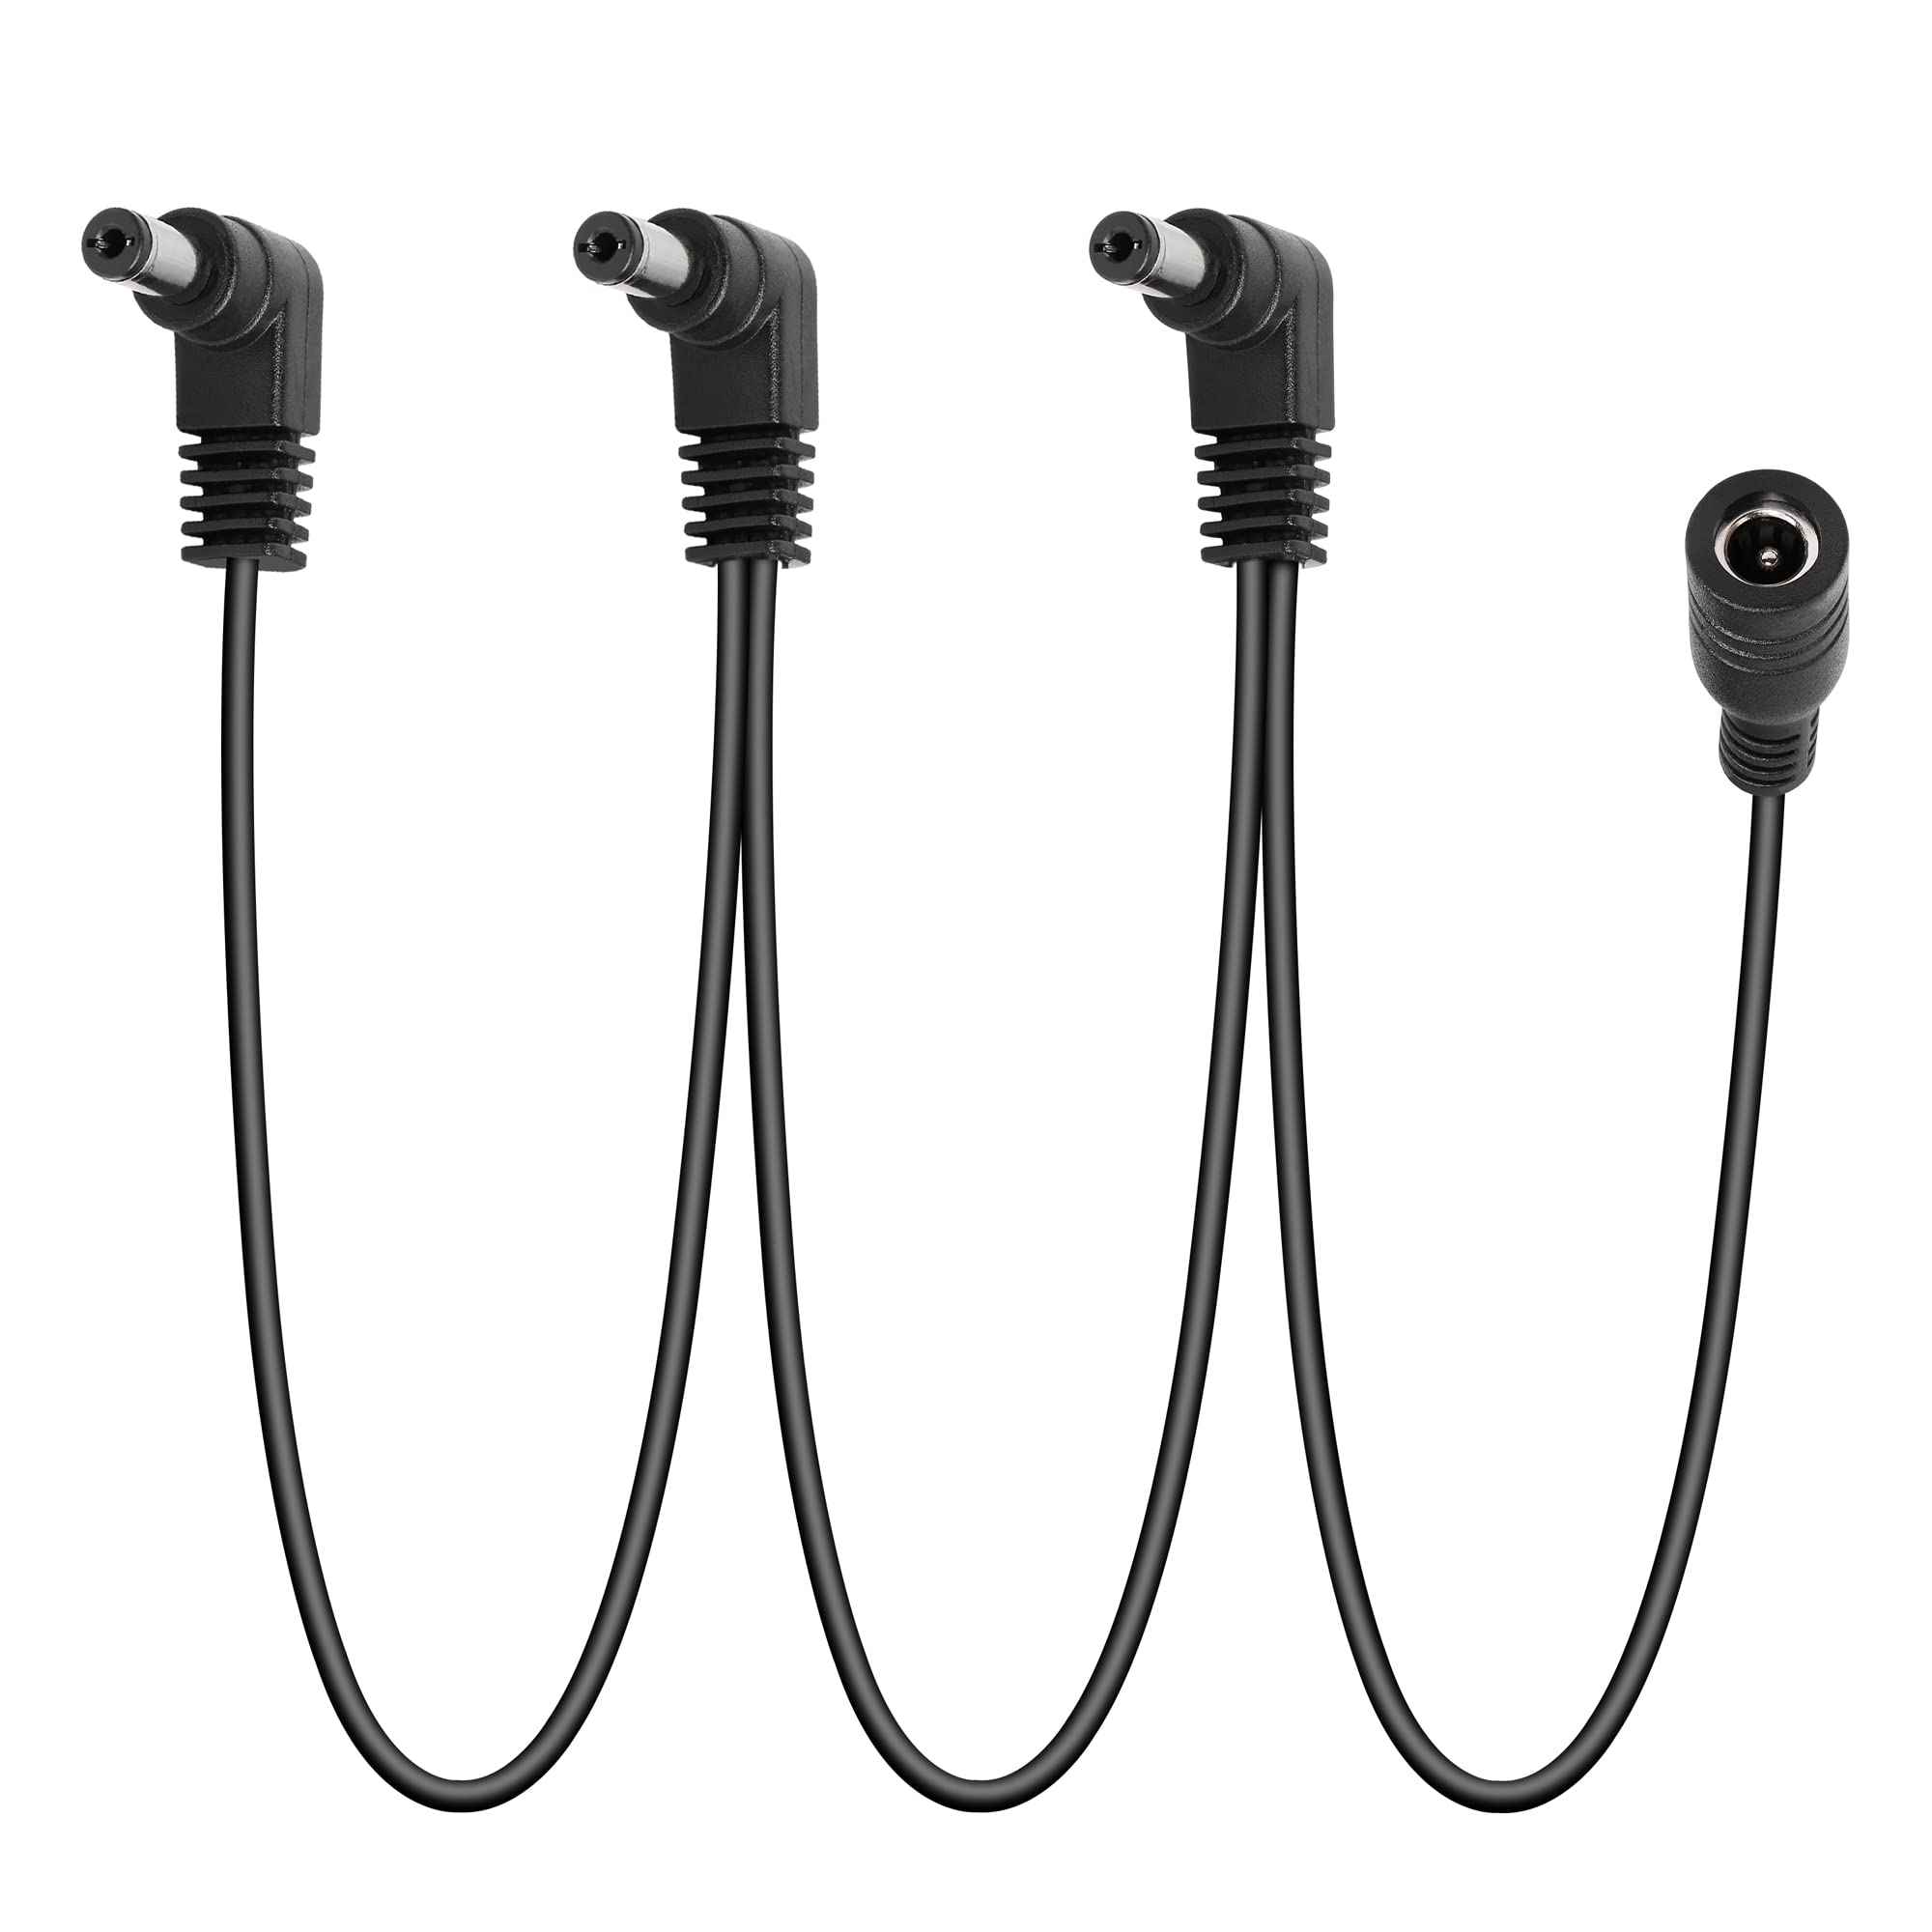
3. Daisy chain cables
To power multiple pedals from one adapter, you can use a daisy chain cable (also called a “spider” cable). But be careful! All pedals on the chain must run on the same voltage, and the total current draw must be less than what the adapter can supply. Back to our leaky bucket metaphor: now each pedal is like another hole adding its own leak. If the adapter can’t keep up, it’ll overheat.
Worse, daisy chains share the same ground across all pedals. That means noise—especially if you have a particularly noisy (usually digital) pedal in the chain. You also run the risk of ground loops, which cause low-frequency hum. This is especially problematic if you split your signal between pedals in front of the amp and pedals in the amp’s effects loop. Daisy chains are fine for emergencies or 1–3 pedals max, but they’re not a long-term solution.
4. The right way : a dedicated pedalboard power supply
To avoid all these headaches, you’ll want a dedicated multi-output pedalboard power supply. Prices range from €30 to €300, and not all are equal. Choose one that has enough isolated outputs for all your pedals and can deliver the right voltage and current for each one. A lot of them have switchable voltage options as well. Now, a power supply of high quality must be filtered, regulated and fully isolated. What does that mean?
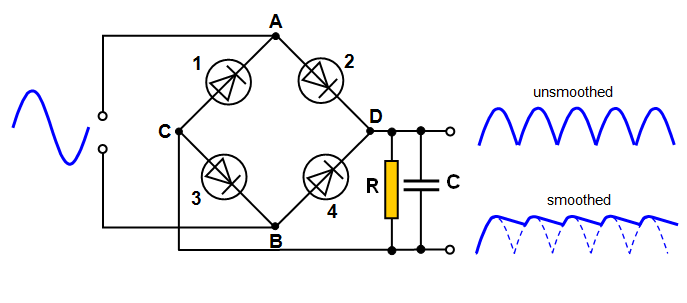
AC from the wall must be converted to DC. This is done with diodes, but they leave behind a lot of ripple—tiny voltage fluctuations. To smooth these out, power supplies use capacitors. Bigger capacitors = better filtering. Cheap “universal” adapters with multiple plugs and variable voltage settings typically have poor filtering and will produce loud hum. They’re not suitable for audio use.
A regulated power supply goes further by using voltage regulators to reduce ripple even more. The result? Clean, stable voltage that won’t mess with your tone.
And finally, isolation is critical. Basic power supplies isolate the AC side using a transformer, and even some multi-output units often don’t isolate each output from the others. This leads to shared grounds, creating the same noise and hum issues as daisy chains. A fully isolated power supply has different isolated power and ground for each of its output. To check if your supply is truly isolated, use a multimeter in continuity mode and touch the center pins of two outputs. If it beeps: they’re not isolated!
Some units isolate outputs in blocks—like the Anasounds K+. That means pedals within a block share the same ground. You should group pedals in front of the amp and effects loop pedals in separate isolated blocks to avoid ground loops as much as possible. You may even need to dedicate an entire isolated output to a single, noisy digital pedal.
Still, some cheap manufacturers don’t filter their circuits properly. Even isolated outputs can share switching noise—especially with budget units like Caline’s. The culprit? Common-mode noise, which requires specialized filtering to eliminate. Very few power supplies actually provide common-mode filtering. Bottom line: designing a great power supply is an art!
With the right power supply, your pedalboard will finally sound like it should : noise-free ! Dedicated pedalboard PSUs are the best option, and I recommend the Walrus Canvas power series, Cioks products and the Strymon Zuma. If you want to support a French company, have a look at the Anasounds K+. On a tight budget? I’ve had decent results with Harley Benton ISO Pro, though I’ve seen reports of issues from some users. In all cases, make sure the specs match your gear. Now that you know how to read a power supply, you’ve got no excuse! ?
Related posts
-
 How to start playing electric guitar
If you feel a bit lost, this post will help you understand the tools needed to start playing the electric guitar or...Read more
How to start playing electric guitar
If you feel a bit lost, this post will help you understand the tools needed to start playing the electric guitar or...Read more -
 The vacuum tube explained
No need to known electronics ! Let's have a look at how a vacuum tube operates, and learn the differences between...Read more
The vacuum tube explained
No need to known electronics ! Let's have a look at how a vacuum tube operates, and learn the differences between...Read more -
 Audio vacuum tubes for dummies
What are the most used vacuum tubes in audio and guitar amplifiers ? What does 12AX7, GZ34 or EL84 do to the sound ?...Read more
Audio vacuum tubes for dummies
What are the most used vacuum tubes in audio and guitar amplifiers ? What does 12AX7, GZ34 or EL84 do to the sound ?...Read more -
 True Bypass vs Buffer Bypass : understanding your guitar pedal's signal path
Learn the difference between true bypass and buffer bypass to optimize your guitar signal. Avoid tone loss and...Read more
True Bypass vs Buffer Bypass : understanding your guitar pedal's signal path
Learn the difference between true bypass and buffer bypass to optimize your guitar signal. Avoid tone loss and...Read more -
 Choosing guitar cables: enhance your sound quality
Learn how guitar cables influence your tone. From capacitance to shielding and tips to maintain signal clarity,...Read more
Choosing guitar cables: enhance your sound quality
Learn how guitar cables influence your tone. From capacitance to shielding and tips to maintain signal clarity,...Read more
Leave a comment